
Have You Ever Used Named Ranges?
The ultimate nightmare when working with a spreadsheet that somebody else has prepared involves trying to figure out exactly what is going on. Billions of cups of coffee must have been drunk the world over in honor of simply trying to get a grip on what is going on!
Today’s Excel tutorial tells you how to simplify your own spreadsheet, and make it a lot easier to understand and workaround with.
Here’s a quick example:

The names of seven people are shown along with their age. Now, one way to compute their average age is simply to go to a cell and type in the formula “=Average()” and be done with it.
Another, far more considerate and professional way involves the following:
First of all, select all the ages. Like so.

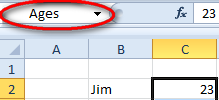
Now, head on over to the “Name Box”. This typically lies just above cell A1. With the range selected, enter the word “Ages” in the box, without the parentheses.
Now, when you want to do any kind of calculation on these ages, all you need to do is , for example, “=average(ages)” in literally any cell in the spreadsheet to have your answer on a plate!
The advantage is you need not enter any ranges for these calculations ever again. Entering named ranges simplifies both entering calculations as well as understanding spreadsheets. Try and use named ranges in your line of work, and you’ll be appreciating it’s stark simplicity and ease-of-use in next to no time.